Windows L2TP/IPsec VPN Server
A Virtual Private Network (VPN) is a way of using a secure network tunnel to carry all traffic between between different locations on the Internet - for example between your local office workstations and servers in your Crosspeer Account, or from your office workstations to your Crosspeer Cloud Servers and then out into the Internet from there.
In this tutorial, well set up a VPN server using Microsoft Windows built-in Routing and Remote Access Service. If you were looking for our tutorial on how to build an L2TP/IPsec VPN on a Linux server, you can find it here.
To do this, well be using the Layer 2 Tunnelling Protocol (L2TP) in conjunction with IPsec, commonly referred to as an L2TP/IPsec (pronounced L2TP over IPsec) VPN. For more information, see the L2TP/IPsec standard (RFC 3193).
Step 1: Initial setup
Youll need to have set up a Cloud Server running Windows. If you are looking to use the VPN to connect to several servers within the Crosspeer Cloud,
make sure that the others are connected to the VPN server by a VLAN as described in our tutorial on VLANs.
If you dont intend to connect to other machines within your Crosspeer Account (for example, if you want to use the VPN for increased privacy while browsing), you wont need the second server - but you will still need to add a second network card and configure it with a private IP as described at the link above. Windows will not allow you to install the Routing and Remote Access Service unless this is true.
By default, Windows Firewall will allow IPsec traffic with no modification. However if you are using a more restrictive set of rules, or the built-in Crosspeer firewall, you may need to allow UDP traffic to ports 500 (IKE) and 4500 (for IPsec Nat traversal).
For the purposes of this tutorial, we will give our VPN server an address of 10.0.5.1 on the VLAN, and connect a second server over the VLAN at 10.0.5.2.
Step 2: Install the Routing and Remote Access Service
First, we make our Windows server into a router by installing the Routing and Remote Access Services (RRAS) role.
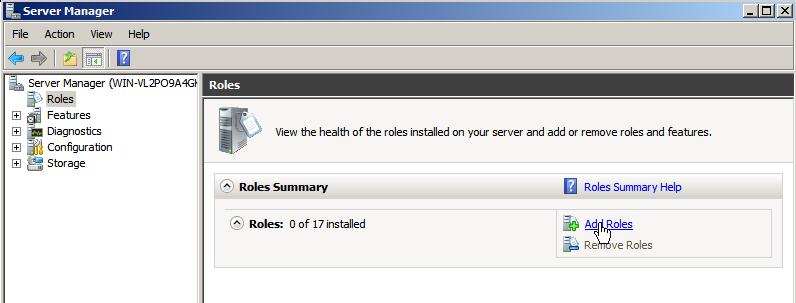
• Click Start, click Administrative Tools, and then click Server Manager.
• In the Server Manager navigation tree, click Roles, and then under Roles Summary, click Add Roles.
A Virtual Private Network (VPN) is a way of using a secure network tunnel to carry all traffic between between different locations on the Internet - for example between your local office workstations and servers in your Crosspeer Account, or from your office workstations to your Crosspeer Cloud Servers and then out into the Internet from there.
In this tutorial, well set up a VPN server using Microsoft Windows built-in Routing and Remote Access Service. If you were looking for our tutorial on how to build an L2TP/IPsec VPN on a Linux server, you can find it here.
To do this, well be using the Layer 2 Tunnelling Protocol (L2TP) in conjunction with IPsec, commonly referred to as an L2TP/IPsec (pronounced L2TP over IPsec) VPN. For more information, see the L2TP/IPsec standard (RFC 3193).
Step 1: Initial setup
Youll need to have set up a Cloud Server running Windows. If you are looking to use the VPN to connect to several servers within the Crosspeer Cloud,
make sure that the others are connected to the VPN server by a VLAN as described in our tutorial on VLANs.
If you dont intend to connect to other machines within your Crosspeer Account (for example, if you want to use the VPN for increased privacy while browsing), you wont need the second server - but you will still need to add a second network card and configure it with a private IP as described at the link above. Windows will not allow you to install the Routing and Remote Access Service unless this is true.
By default, Windows Firewall will allow IPsec traffic with no modification. However if you are using a more restrictive set of rules, or the built-in Crosspeer firewall, you may need to allow UDP traffic to ports 500 (IKE) and 4500 (for IPsec Nat traversal).
For the purposes of this tutorial, we will give our VPN server an address of 10.0.5.1 on the VLAN, and connect a second server over the VLAN at 10.0.5.2.
Step 2: Install the Routing and Remote Access Service
First, we make our Windows server into a router by installing the Routing and Remote Access Services (RRAS) role.
• Click Start, click Administrative Tools, and then click Server Manager.
• In the Server Manager navigation tree, click Roles, and then under Roles Summary, click Add Roles.
The Add Roles Wizard will appear.
• On the Before You Begin page, click Next.
• On the Select Server Roles page, select Network Policy and Access Services, and then click Next.
• On the Network Policy and Access Services page, click Next.
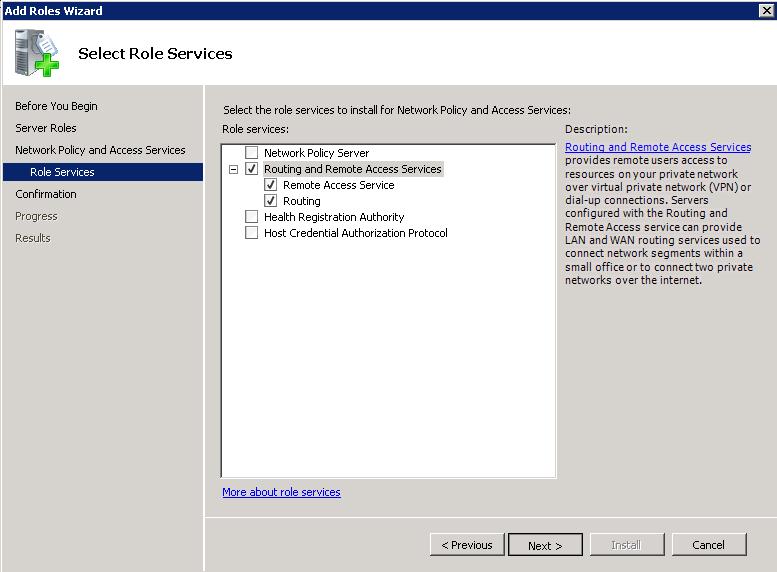
• On the Select Role Services page, select Routing and Remote Access Services, and then click Next.
This automatically selects all services for the RRAS role.
• On the Before You Begin page, click Next.
• On the Select Server Roles page, select Network Policy and Access Services, and then click Next.
• On the Network Policy and Access Services page, click Next.
• On the Select Role Services page, select Routing and Remote Access Services, and then click Next.
This automatically selects all services for the RRAS role.
Step 3: Enable the Routing and Remote Access Service
Having installed the service, we must now start it and enable the components we want to use.
• If this server is a member of an Active Directory domain, then add the computer account of this server to the RAS and IAS Servers security group in
the domain of which this server is a member. You can use Active Directory Users and Computers or the netsh ras add registeredserver
command. If this server is using local authentication or is not part of a domain, skip this step.
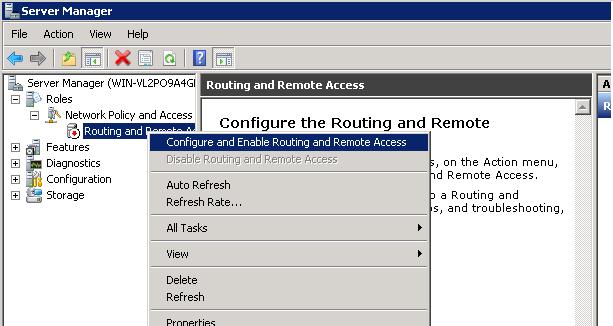
• Open the Routing and Remote Access MMC snap-in. In Server Manager, expand Roles, expand Network Policy and Access Services,
and then click Routing and Remote Access.
• In the navigation tree, right-click Routing and Remote Access, and then click Configure and Enable Routing and Remote Access.
• On the Confirm Installation Selections page, click Install.
• On the Installation Results page, click Close.
• On the Installation Results page, click Close.
• On the Welcome page, click Next.
• On the Configuration page, select the option that contains the RRAS components you need, and then click Next. For the purposes of this
tutorial, we will build a simple VPN server for remote clients, so we will select the first option, titled Remote Access (dial-up or VPN).
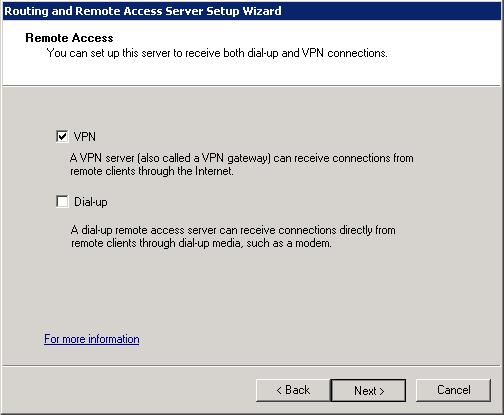
• On the Remote Access page, select VPN and Dial-up check boxes as required, and then click Next. Here, we choose VPN.
• On the Configuration page, select the option that contains the RRAS components you need, and then click Next. For the purposes of this
tutorial, we will build a simple VPN server for remote clients, so we will select the first option, titled Remote Access (dial-up or VPN).
• On the Remote Access page, select VPN and Dial-up check boxes as required, and then click Next. Here, we choose VPN.
• On the VPN Connection page, select the network interface that is connected to the public network, and then click Next.
A checkbox on this page will ask whether you want to enable static packet filters: these are simple, stateless packet filters which will block everything except VPN traffic. How you configure these will depend on your security stance and whether this server will fulfil any other roles.
Be careful! If you are working on this server over RDP, enabling these filters without making any changes will cause you to lose your RDP connection. If that happens, you can still use VNC to connect to the server.
For more information on static packet filters, see:
Microsofts advice on configuring static packet filters
Technet Blog: The Dos and Donts of static packet filters
Should you choose to enable this, you can allow services through as described at the first link above - for example, to enable RDP simply add an inbound filter allowing TCP traffic to port 3389, and an outbound filter allowing TCP traffic from port 3389.
• On the IP Address Assignment page, you will be given a choice of options: to assign IPs to remote clients automatically, or to manually specify an
IP address range from which to hand out addresses. For the purposes of this tutorial, we will assign a manual range, so choose From a Specified
Range of Addresses and then click Next.
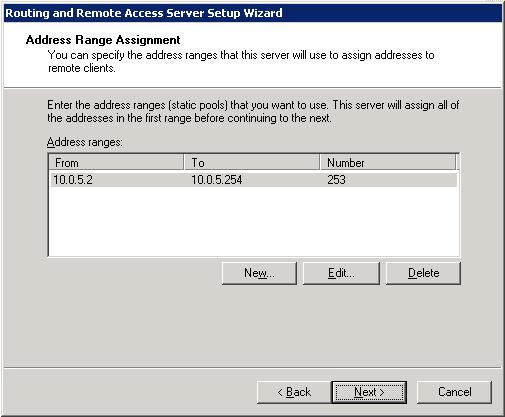
• On the Address Range Assignment page, click New, and then enter the starting and ending addresses of the range you have chosen. This should
be within the same subnet as your servers internal VLAN address. Since our example subnet is 10.0.5.0/24, well choose 10.0.5.50-10.0.5.250 -
giving us plenty of room for other servers within the VLAN. Click OK to save the range, and then click Next when you are done.
A checkbox on this page will ask whether you want to enable static packet filters: these are simple, stateless packet filters which will block everything except VPN traffic. How you configure these will depend on your security stance and whether this server will fulfil any other roles.
Be careful! If you are working on this server over RDP, enabling these filters without making any changes will cause you to lose your RDP connection. If that happens, you can still use VNC to connect to the server.
For more information on static packet filters, see:
Microsofts advice on configuring static packet filters
Technet Blog: The Dos and Donts of static packet filters
Should you choose to enable this, you can allow services through as described at the first link above - for example, to enable RDP simply add an inbound filter allowing TCP traffic to port 3389, and an outbound filter allowing TCP traffic from port 3389.
• On the IP Address Assignment page, you will be given a choice of options: to assign IPs to remote clients automatically, or to manually specify an
IP address range from which to hand out addresses. For the purposes of this tutorial, we will assign a manual range, so choose From a Specified
Range of Addresses and then click Next.
• On the Address Range Assignment page, click New, and then enter the starting and ending addresses of the range you have chosen. This should
be within the same subnet as your servers internal VLAN address. Since our example subnet is 10.0.5.0/24, well choose 10.0.5.50-10.0.5.250 -
giving us plenty of room for other servers within the VLAN. Click OK to save the range, and then click Next when you are done.
• On the Managing Multiple Remote Access Servers page, specify that you will use the local RRAS server to authenticate your remote access clients, and then click Next.
• Youll be presented with a summary of the options you have chosen. Review them to make sure they are correct, and then click Finish.
• Youll be presented with a summary of the options you have chosen. Review them to make sure they are correct, and then click Finish.
Step 4: Remote Authentication and Forwarding options
Now we need to set a preshared key (PSK). We will also confirm that the server is configured to forward packets.
Note that it is also possible to use certificate-based authentication, but this is not covered by this guide. While PSK authentication is secure enough for most uses, you should be aware that this may leave servers vulnerable to Man in the Middle (MitM) attacks, potentially allowing a malicious server to masquerade as the VPN gateway. This is only possible if the attacker is in possession of the preshared key.
If you would prefer to use certificate authentication you must purchase an SSL certificate or use the Active Directory Certificate Services role to create your own.
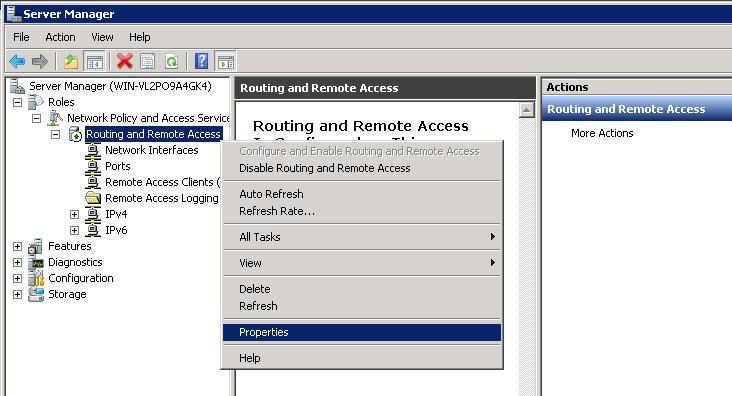
• Right-click the Routing and Remote Access snap-in, and select Properties.
Now we need to set a preshared key (PSK). We will also confirm that the server is configured to forward packets.
Note that it is also possible to use certificate-based authentication, but this is not covered by this guide. While PSK authentication is secure enough for most uses, you should be aware that this may leave servers vulnerable to Man in the Middle (MitM) attacks, potentially allowing a malicious server to masquerade as the VPN gateway. This is only possible if the attacker is in possession of the preshared key.
If you would prefer to use certificate authentication you must purchase an SSL certificate or use the Active Directory Certificate Services role to create your own.
• Right-click the Routing and Remote Access snap-in, and select Properties.
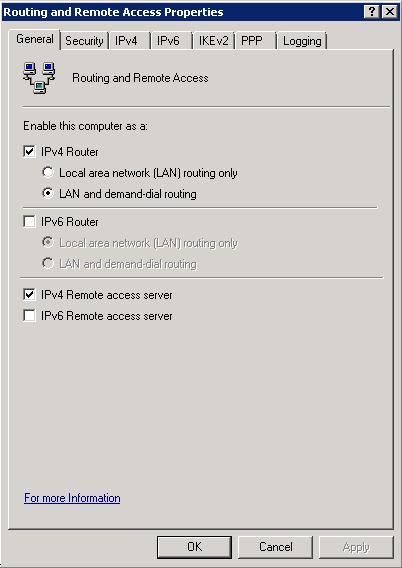
• On the General tab, make sure that the boxes are checked to enable the computer as an IPv4 Router, and an IPv4 Remote Access Server.
• On the IPv4 tab, make sure that the box titled Enable IPv4 Forwarding is checked.
• On the Security tab, check Allow custom IPsec policy for L2TP connection and enter a preshared key in the text box as shown. This will act
as a shared password you will use to connect users (in addition to Windows own user authentication), and should therefore follow your normal rules
for password strength.

• Once this is applied, you will need to restart your server.
Step 5: Configure a Remote Access Network Policy
• Open the Server Manager and select Local Users and Groups, or Active Directory Users and Computers if this computer is a member of a
domain. Then right-click the user account to which you wish to grant privileges, and click Properties:
• Open the Server Manager and select Local Users and Groups, or Active Directory Users and Computers if this computer is a member of a
domain. Then right-click the user account to which you wish to grant privileges, and click Properties:
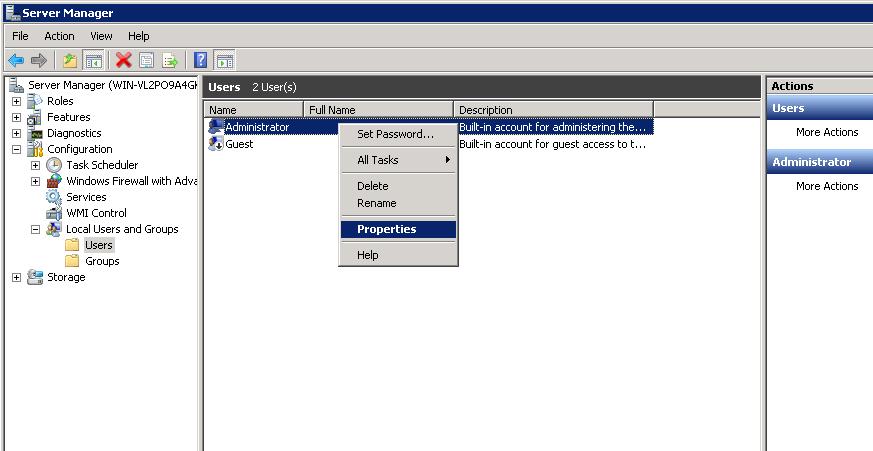
Here, we are granting VPN access to the Administrator account.
• Select the Dial-in tab.
• In the Network Access Permission section, select Allow Access.
• Click Apply, and close the tab.
Your VPN server will now connect remote clients to your Crosspeer VLAN, but wont allow remote clients to route normal internet traffic through the VPN. If thats all you wanted to do, you can stop here - simply follow the instructions in our Windows or Linux VPN client guide to connect a remote machine.
Step 6 (Optional): Enable NAT
If you are intending to send the remote machines internet traffic through the VPN, youll need to take a few extra steps to enable the VPN server to do Network Address Translation (NAT) for remote users. You can do this by following the steps in this section.
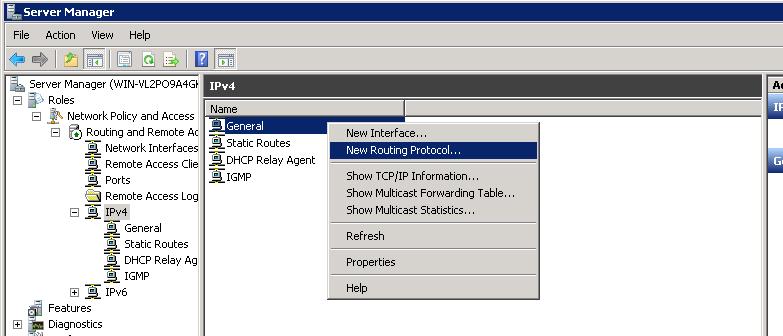
• In the Server Manager, expand Roles, Network Policy and Access Services and then expand Routing And Remote Access.
• In the IPv4 tab, right-click General, and select New Routing Protocol.
If you are intending to send the remote machines internet traffic through the VPN, youll need to take a few extra steps to enable the VPN server to do Network Address Translation (NAT) for remote users. You can do this by following the steps in this section.
• In the Server Manager, expand Roles, Network Policy and Access Services and then expand Routing And Remote Access.
• In the IPv4 tab, right-click General, and select New Routing Protocol.
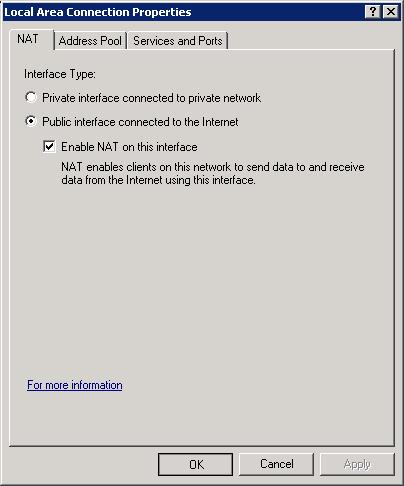
• Select NAT, and click OK. A new option will appear under IPv4, entitled NAT.
• Right-click NAT, and select New Interface. Select your public internet interface and click OK.
• Select Public Interface Connected to the Internet, and Enable NAT on this interface.
• Right-click NAT, and select New Interface. Select your public internet interface and click OK.
• Select Public Interface Connected to the Internet, and Enable NAT on this interface.